Manage Report Recipient, Month End Summary Report and Auto-Assignment of Incident Report Rules
The Case Management Systems provides this rules pages to allow the client to create rules for which users should be a report recipient, which users should receive a month end summary report and which users should be auto-assigned as an investigator based on certain criteria.
A report recipient is someone who will receive a report notification email when Lighthouse adds a report to the Case Management System. The criteria for a report recipient could be related to certain divisions, locations, or incident types. A report recipient could also receive an email notification for all reports added by Lighthouse.
A month end summary report recipient is someone who will receive an email at the beginning of every month that provides a summary of reports added in the previous month. By default, a company receives month end summary reports by Incident Type but could also receive them at a company level or division level. The criteria for a month end summary report recipient could be related to certain divisions or incident types depending on the level set for your company. A month end summary report recipient could also receive a month end summary report for all incident types or all divisions depending on the report level set for your company.
One of the most important functions of the Case Management System is the ability to auto-assign an investigator to a report based on certain report criteria. The CMS allows a company to create auto-assignment rules for their users based on the following incident report information: Division, Incident Type, Location, and Submitted By (Lighthouse or Internal).
The Manage Report Recipient, Month End Summary Report, and Auto-Assignment Rules page shown below is used to create rules that define when a user is a report recipient, a month end summary report recipient and when that user should be automatically assigned to an incident report by the CMS. Multiple rules can be created per user.

To add a new rule for a user, click the Add page toolbar icon,  .
.
To edit an existing rule for a user, click on the Edit Record row icon,  , on the corresponding row for that user.
To view an existing rule for a user, click on the Show Record row icon,  , on the corresponding row for that user.
To delete an existing rule for a user, click on the Delete Record row icon,  , on the corresponding row for that user.
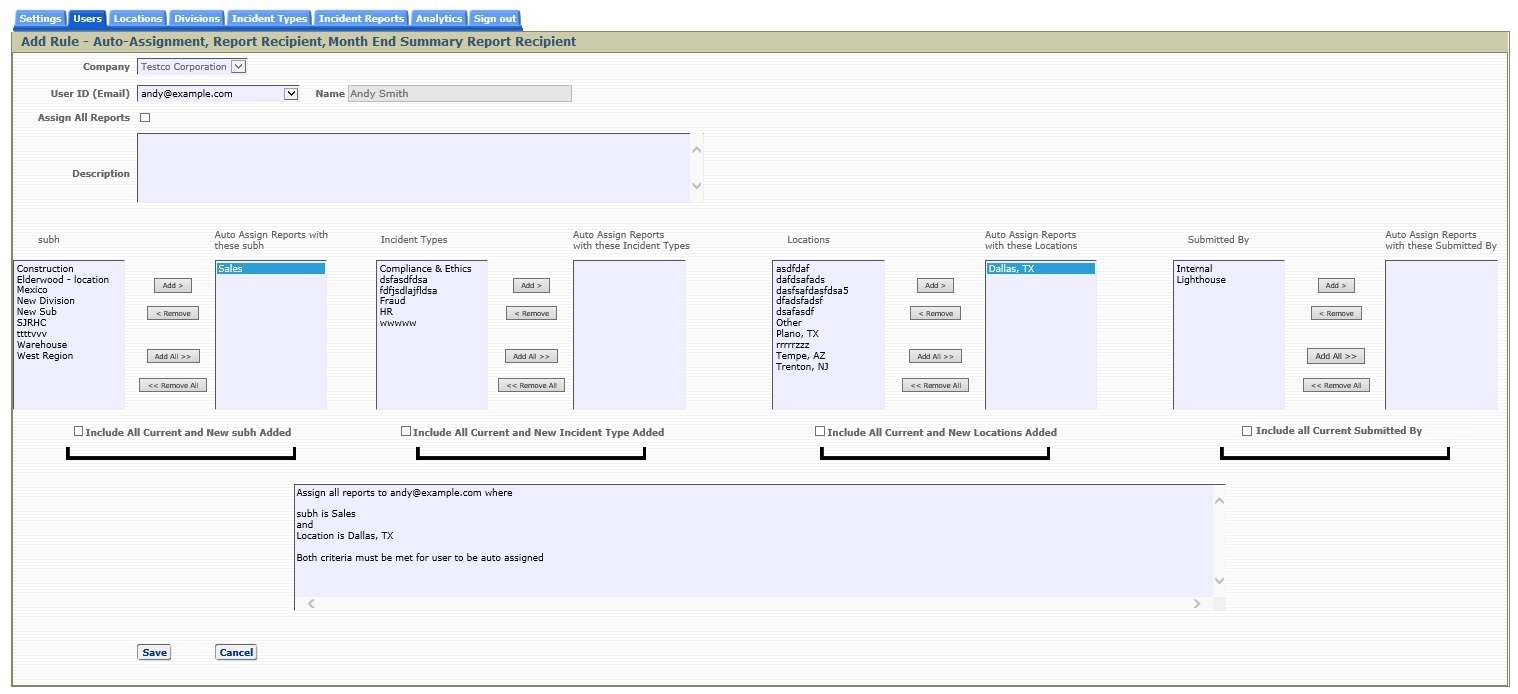
After clicking the Add page toolbar icon, the Add Auto-Assignment page below is displayed. This is the page used to create the specific auto-assignment rule that will be utilized by the CMS to automatically assign reports to a user based on incident report information.
![]()
Note: For entries to appear in the Divisions and Locations list boxes, you must create divisions using the Add Division page and create locations using the Add Locations page. To have any other Incident Types appear in the Incident Types list box other than the Lighthouse defaults, you must create those incident types on the Add Incident Types page. For Auto-assignment to function on those three fields, you must have created those divisions, locations and incident types within the CMS.
Creating a report recipient rule
- Choose a user from the dropdown field 'User ID (Email)'.
- Check the Report Recipient' checkbox
- If the user chosen is to receive an email when any report is added to the CMS by Lighthouse, check the box 'All Reports'.
- Enter a description of the rule in the Description field
- If 'All Reports' is not checked, then choose the criteria that need to be met in order for the user to receive an email when any reprot is added to the CMS by Lighthouse.
Creating a month end summary report recipient rule
- Choose a user from the dropdown field 'User ID (Email)'.
- Check the 'Month End Summary Report Recipient' checkbox
- If the user chosen is to receive all month end summary reports, check the box 'All Reports'.
- Enter a description of the rule in the Description field
- If 'All Reports' is not checked, then choose the criteria that need to be met in order for a month end summary report to be sent to the user selected.
Creating an auto-assignment rule
- Choose a user from the dropdown field 'User ID (Email)'.
- Check the 'Assign User to Report' checkbox
- If the user chosen is to be automatically assigned to all incident reports, check the box 'All Reports'.
- Enter a description of the rule in the Description field
- If 'Assign All Reports' is not checked, then choose the criteria that need to be met in order for a report to be auto-assigned to the user selected.
To include any new divisions or incident types that are created in the future for an report recipient or month end summary report, check the checkbox beneath the corresponding criteria. For example, to include all future divisions for a report recipient rule, click the 'Include All Current and New Divisions Added'. These check boxes are automatically checked and disabled when the 'All Reports' checkbox is selected.
To include any new locations, divisions, or incident types that are created in the future for an auto assignment rule, check the checkbox beneath the corresponding criteria. For example, to include all future divisions in an auto-assignment rule for a user, click the 'Include All Current and New Divisions Added'. These check boxes are automatically checked and disabled when the 'All Reports' checkbox is selected.
To select the criteria, click on one or more items in the left-handed grouped boxes and then select the 'Add' button next to the selected items. To select all items in the listbox click the 'Add All' button. Multiple entries can also be selected in the listbox and added or removed using the Add or Remove buttons, respectively.
The information that can be chosen for the rule's criteria include Division, Incident Type, Location, and Submitted By.
Button descriptions
Add - clicking this button adds all of the highlighted items from the group box to the left of the button to the right-handed listbox which describes the values that will be used to determine if this user should or should not be auto-assigned to an incident report. For example, if the divisions 'Construction' and 'Sales' were chosen as criteria for auto-assigning a report to this user, any report in CMS that has a division of 'Construction' or 'Sales', will auto-assign the report to this user as an Investigator.
Add All - clicking this button selects all of the items related to the grouped boxes as criteria for the auto-assignment rule
Remove - clicking this button removes a previously selected item (or items) as the criteria for the auto-assignment rule
Remove All - clicking this button removes all of the items previously selected as criteria for the auto-assignment rule
Additional examples of auto-assignment rules
To create a rule to auto-assign the user 'andy@example.com' to reports where the division is 'Sales' and the location is 'Dallas, TX', select the user 'andy@example.com' from the User ID dropdown list, then select the division 'Sales' and click the 'Add' button to the right. The division 'Sales' will be moved from the left-handed grouped box to the right-handed grouped box. Select the location 'Dallas, TX' and click the 'Add' button to the right of that selection. The note at the bottom of the page will explain in plain English what the auto-assignment rule means. Click the 'Save' button to create that auto-assignment rule for the user 'andy@example.com'. From this point on, any time a report is created (or changed) and that report has a division value of 'Sales' and a location value of 'Dallas, TX', the user andy@example.com will be assigned as an investigator on that report.
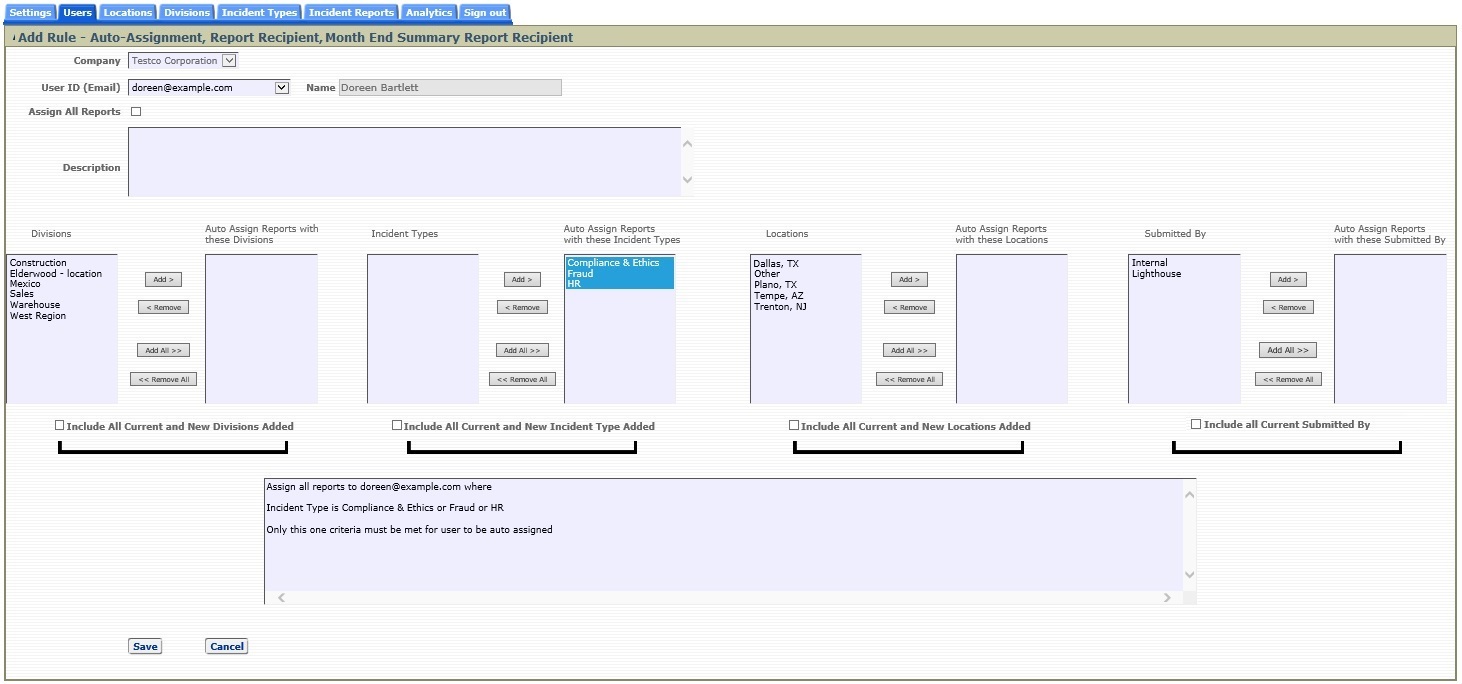
To create a rule to auto-assign the user 'doreen@example.com' to all reports where the incident type is 'Compliance & Ethics', 'Fraud' or 'HR', select the user 'doreen@example.com' from the User ID dropdown list, then select the 'Add All' button next to the Incident Types. All of the Incident Types will be moved from the left-handed grouped box to the right-handed grouped box. The Note at the bottom of the page will explain in plain English what the auto-assignment rule means. Click the 'Save' button to create that auto-assignment rule for the user 'doreen@example.com'. From this point on, any time a report is created (or changed) and that report has an Incident Type of 'Compliance & Ethics', 'Fraud' or 'HR', 'doreen@example.com' will be assigned as an investigator.
Editing a user's auto-assignment rule
To Edit an auto-assignment rule, click on the Edit Record row icon,, corresponding to the user. The Edit Auto-Assignment page will be displayed and the behavior of the page will be similar to the Add Auto-Assignment Rule page shown above except that the username field cannot be edited.
After creating or editing an auto-assignment rule, the user will have the opportunity to process all of the company's existing reports according to the new/updated rule. The user will be shown the alert below.
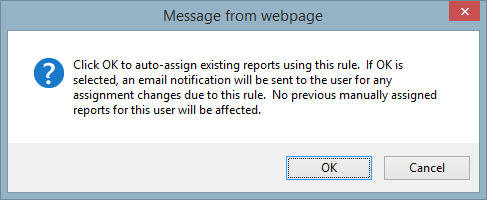
If the user selects 'OK', all existing reports will be processed according to the new/updated rule and assignment changes will be processed and the user will receive a notification email of any assignment changes.
If the user selects 'Cancel', this rule will only be applied to any new report created in the CMS or any existing report that is subsequently edited and reprocessed for auto-assignment due to changes of rule criteria on the edited report.
Note: These examples above can also be applied for Report Recipient and Month End Summary Report Recipient. Choosing the criteria is the same process for each type of rule (Report Recipient, Month End Summary Report Recipient and Auto-assignment)